
I guess it’s time to
finish off those plums. You
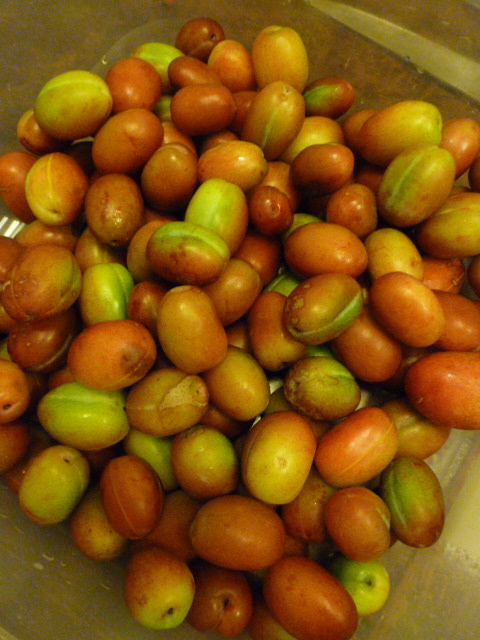
remember the plums, the ones from my friend Lindsay’s tree? The ones I made into two kinds
of sauce to go with duck (or stir fried pork and beef since), and chutney,
and a tart (that I still have to write up)? And, as I promised, jam?
This was, I have to
admit, the first time I’ve ever made jam, so I won’t pretend to be an expert,
but will instead point you in the direction of someone who seems to be. I did a fair bit of research, and
pretty much all the recipes I found were, broadly speaking, much the same - I settled
on the Cottage
Smallholder’s version though because I liked both the simplicity of the
recipe itself and the clarity of its description. Also because it had a variation specifically for ‘barely
ripe’ plums, which was exactly what I was working with. And although the plums they were
talking about were apparently Wild Plums, their picture of them did look just
like mine (stop sniggering at the back there…)
I won’t bother
reproducing the recipe here - just click on the link,
- as I followed it pretty much line for line, and I wouldn’t want to even give
the impression that I was claiming any kind of authorship. The one twist of my own that I added on
this occasion was throwing in a single pod of star anise and a two inch length
of cinnamon stick, for an added hint of spice. By and large, I’d have to say it wasn’t at all bad for a
first attempt at jam making - coming out as it did, above all, really plummy - but there are a few things I’d experiment with
changing next time.
Firstly, the amount of
sugar used. This was pretty
standard in all the recipes I found, at equal weights of fruit and sugar. In fact I used rather lower proportion of
sugar than that, two 1 kilo bags of regular granulated for 2.3 kg of
plums. Still the finished jam was
a little bit on the sweet side for my – and particularly Becca’s tastes. Next time I’ll reduce the sugar content
even further, perhaps as far as two parts sugar to 3 of fruit (which would have
been about 1.5kg of sugar in this case).
I’ll also add the juice, and maybe the zest, of a lemon or two, just for
added zing and a touch of tartness.

I used regular sugar
rather than preserving sugar and followed the tip that appears in the comments
section below the recipe for adding pectin by cracking a handful of plum stones
and tying them up in a muslin bag which you then drop in the pan with the plums
for the natural pectin in the plum stone kernels to act as the setting
agent. That was if anything too
successful – personally I feel home made jam should be distinctly runny, mine
is set firm. I used about a dozen
cracked stones in my muslin bag.
Next time I’d make it a half dozen.
Speaking of setting,
the cold plate trick for testing the setting point of jams and jellies has
never worked for me. This is where
you put a plate in the fridge and test for setting by drop a blob of your
boiling jam/jelly onto the cold plate, put it back in the fridge for a minute
or so, then prod it with your finger.
If set the surface of your blob should wrinkle. I have always just ended up with two
cold plates covered in sticky smears, not a sign of a wrinkle, and eventually
just gone with gut instinct that if the jam/jelly hasn’t been boiling long
enough and hard enough to set now, then it never will. And if anything, every time my
jam/jelly has, if anything come out erring on the side of oversetting. My medlar
jelly in particular – delicious though it was (and still is, just one jar
left now…) – could have made a powerball.
I don’t know if this indicates that my fridge just doesn’t get as cold as
it claims to, but I don’t think so – it seems satisfactorily chilly in every
other regard. Maybe I should just
get myself a jam thermometer. Or
trust to instinct, like I do with most other aspects of cooking…

One last point – as I
said, one of the key things that attracted me to the Cottage
Smallholder’s recipe was that it seemed simple. And it was.
The other impression I got from reading it was that – apart from the
steeping of the fruit in sugar over night – it was pretty quick. It wasn’t. The only mention of timing in the recipe is 8-10 minutes of
continued rapid boiling, rather skipping over the ‘bring to the boil’ bit. Well, in my experience, bringing over
4kg of combined fruit and sugar to the boil in the first place takes a long
time. A really long time. After all, you don’t want to turn your
biggest, fiercest gas burner on full under the pan, because that’ll just burn
the fruit and sugar at the bottom before the heats even got to the top. And then, the recipe says, once the
jam’s reached setting point, at that stage you just carefully remove the plum
stones with a slotted spoon as they float to the surface, as if that was the
work of a moment. Again, it’s
not. When you’re working with
2.3kg of small plums, that’s a good twenty minutes worth of prodding and poking
(because my plum stones, at least, weren’t cooperative enough to just ‘float up
to the surface’) and scooping on it’s own. So I’d recommend starting that process before you’re even
wondering whether or not your jam’s reached setting point. All in all, I can tell from the timestamps
on the photos I took, it was a full three hours from putting the sugar and
fruit into the pan to putting lids on jars of jam. Working with smaller quantities, scooping stones sooner and
more efficiently, and having more confidence in your gut telling you that
setting point’s been reached even if your cold plate isn’t wrinkling will reduce
that time considerably, but still.
Leave yourself a full morning (or afternoon or evening).

And that just leaves the tart. But in the mean time, here's a tasty bit of crumpet (with a dollop of plum jam)...

I found these 11 commandments of jam-making, which seem to cover the main points:
ReplyDeletehttp://www.thegoodsoup.com/skills/preserving/best-jam/
Following the advice given there, I split my 4lbs of raspberries into 2 batches. The first batch I fear may have set too solid; the second, I judged by eye and think will turn out softer. I do have a jam thermometer, but I'm not sure it's all that useful - the jam hardly ever gets up to 220 degrees...
I reckon you can just tell, when it gets gloopy enough on the wooden spoon.
DeleteOh, and I used half as much sugar as jam, by weight, and no pectin.
Delete