Thursday, 28 April 2011

Asparagus, Jersey Royals, firing up the barbie. Ah, Springtime...


It may have felt like high summer for much of the past week or so, but we really have only just got spring into full swing, with trees bursting into leaf and blossom, birds singing their little hearts out and British asparagus and Jersey Royal potatoes hitting the supermarket shelves.  These items, along with the slightly earlier and previously mentioned purple sprouting broccoli are true harbingers of spring, marking the arrival of that season in the kitchen much more effectively than any single swallow makes a summer – if for no other reason than that the swallows are just getting here too early.  I saw my first single swallow of the year the weekend before last (on a trip up to the Wirral for a family do, and they can’t possibly be arriving on Merseyside first…), just a day or two after my first sighting of Evesham asparagus.  I blame global warming.

In fact I can’t help but think that global warming is having its effect on Asparagus too.  I could have sworn that the British season started in late April, even the beginning of May and ran through to mid June, and that would appear to be confirmed by the home page of the British Asparagus association website, but it seems to get under way much earlier than that these days.  As I say, it was a couple of weeks ago now that I saw my first bunches of the year on display - although I didn’t get a chance to bring any home and cook with it till last week (sorry for being slack…).  Mark Hix (who always makes a feature of asparagus season – and Jersey Royals on his restaurant menus) ran his annual asparagus celebration in his weekly Independent column on April 2nd this year, compared to the 12th in 2008, which did appear to support my earlier-every-year-global-warming thesis, until Google revealed that in 2010 it appeared as early as the 27th of March.  March! Although that one did say the first spears would be cropped any day now, rather than reporting that they’d already arrived… Hugh Fearnley Whittingstall in the Guardian left it as late as May 9th in 2009, but he doesn’t seem to make an annual event of it, so it’s impossible to deduce a pattern from that.

Whatever, I’m quite sure that the British asparagus season starts substantially earlier, and lasts much longer than it ever used to, which quite likely does have something to do with global warming, but probably has as much to do with growers cashing in on the recent rise to fashionability of both British food and local, seasonal eating.  Both of which asparagus could be cast as poster vegetable for.  Because British asparagus, particularly that grown in the Vale of Evesham is celebrated as being the world’s best, it does, still, have a limited season, and it is one of those food stuffs for which freshness is most crucial (all of which can also be said, incidentally, of Jersey Royal potatoes).  So, without wishing to appear to be a slave to fashion, or jumping on to the first passing faddy bandwagon, I would encourage anyone to make the most of the British asparagus while it’s here.  And that extends to not making a habit of buying the imported stuff the rest of the year (or even making a habit of not doing so.  Not that there is anything inherently evil about, say, Chilean asparagus, although more militant anti-food-milers would no doubt have something to say about that.


As for what to do with your asparagus, it’s not so much a question of suggesting recipes, as things to have it with.  As far as cooking goes*, it really is a question of keeping it simple, either steaming it or boiling it, for just three or four minutes depending on how hefty the spears are.  Or chargrilling it on a griddle pan or, perhaps best of all, the barbecue.  Serve it simply dressed with salt, pepper and melting butter if you don’t have a dairy allergic girlfriend, or a vinaigrette if you do – or simply if you prefer, and why shouldn’t you?  Similarly a poached egg, mayonaise or hollandaise are classic accompaniments that only work in this house if I’m doing myself a solo lunch (and then I am never, ever going to go to the bother of hollandaise, believe me, although it’s no secret to readers of this blog that a poached egg might easily make an appearance.  Or even, I have no shame in admitting, a jar of Hellmann’s out of the fridge).  My first asparagus of this year was just such a lunch, steamed alongside a poached egg on a piece of brown bread, with its crusts removed and lightly fried in olive oil.  Don’t tell Becca, but I would be amazed if this first asparagus experience of the year get’s bettered - asparagus and a poached egg being a combo of preternatural perfection.

A risotto is good, made, plain, in the usual way and with cooked asparagus spears stirred in right at the end, or, better, in my opinion, because it will taste more asparagussy (If I can say that), with the bottom half (the thicker, tougher, half, even after trimming) of each asparagus spear sliced into 1cm lengths, and these pieces thrown in with the onion or shallots at the beginning of the risotto making process, then the tips thrown in to cook with the rice towards the end, for the last ten minutes or so (less if the spears are slender).


Another great combo, if not quite in the poached egg category, if only for lack of dunking potential, is asparagus and prawns.  And this is where the barbeque comes into its own.  First marinade the prawns, shell on, in salt, pepper, finely sliced garlic and fresh red chilli (or dried chilli flakes would be good too), grated lemon zest, the juice of the lemon and plenty of olive oil.  Throw in a handful of chopped fresh herbs too if you have them, I used parsley and dill here.  Leave them to marinate in the fridge for ideally a couple of hours, or at the very least while your barbeque is heating up.  Toss the asparagus in a similar, but simpler marinade - definitely leave out the garlic and chilli, but the lemon and parsley would work, or just the salt, pepper and olive oil would be fine.  Then simply grill the prawns whole on the barbecue, then once they’re done and cooling down enough to handle, grill the asparagus spears.  They’ll need little more than a minute on each side on an averagely hot barbecue, if that.  For those who aren’t allergic, a dipping sauce of garlic, chilli and lemon mayonnaise would work nicely with this – just finely chop the garlic and chilli, and grate a little lemon zest into a small bowl or ramekin of mayo, with a squeeze of lemon juice stirred in.


I had intended to get the asparagus and Jersey Royals together in a salad, but found we’d used up all the asparagus before getting round to it.  No matter, a few chopped stems and a couple of the purple flowers from the pot of chives on the balcony substituted most effectively, not to say prettily, for the asparagus, tossed together with the still warm boiled potatoes, along with some shredded smoked streaky bacon fried up with a handful of pine nuts, sliced red pepper, fennel, celery, spring onion and cucumber, all dressed in salt, pepper, the juice and grated zest of half a lemon and some good tasty extra virgin olive oil.


* As far as preparation it’s simply a matter of removing the woody ends of the stems.  Obviously this can be done by trimming them with a knife, but that involves a lot of guesswork and most probably the wastage of a fair proportion of perfectly good tender spear (or the picking out from your teeth some unpleasantly fibrous stub ends).  I find the best, and easiest, way is to snap them by hand: simply grip each spear lightly with a hand at each end, thumbs resting under the middle (or a bit more towards the thick end) of the spear, and bend downwards.  The spear will naturally shear at the point where delicious tenderness becomes woody inedibility.

Friday, 22 April 2011

Veal rib: Less is More.


 Picking up on a theme I touched on briefly a post or two back, on the subject of ham hocks, it makes nothing but good sense to make a little meat go a long way, for all kinds of reasons.  For most of us it’s probably healthier to eat less meat than we do.  It’s certainly cheaper, which is always a good thing, even without the compulsory ‘in these recessionary times’ qualifier.  Environmentally, the arguments for reducing meat consumption are compelling, if not enough to convince me to give up meat entirely.  And ethically I believe it to be an obligation on all of us who do eat meat to at least try to make as much of each animal that dies on our behalf as we can.  In this last regard we are compelled, I believe, somewhat paradoxically, to eat both less and more meat.  That is to eat less of more of the animal.  Hence my regular returns to the theme of ‘forgotten’ cuts on this blog. 

Today though it’s not so much a forgotten cut I’m thinking about - although it is an unusual one, for me, and I would imagine most people – as a different approach to as familiar an idea as a Sunday roast.  In this I am very much following on from the ham hock post in which one of the ways I used a hock was to treat it as a mini roast ham, first boiled, then glazed in honey and mustard, which served two of us very well for a midweek supper.  In this case it was a single veal rib, reduced to clear on the meat counter at the John Lewis Food Hall that I saw and thought of Sunday lunch.


In addition to all the reasons given above for eating less meat, when you’re cooking for two, and it comes to a traditional Sunday roast, you generally don’t bother.  It just seems too much work, too much oven time.  Just too much meat.  Although given how very good cold roast meat, particularly cold roast beef, can be (did I say very? How about very, very...?) then that’s not actually a good reason not to roast up a big slab of a joint on Sunday and let the leftovers feed you the rest of the week.  Nevertheless, you tend not too.  Partly I think, because you know that a traditional Sunday roast more or less takes up your whole Sunday.  Not just the cooking time, but the fact that it’s a big meal, one you don’t want to rush, and when you are done with it, you tend to have eaten so much that you really are done for the day.  Which can be a wonderful feeling, but isn’t always what you want to do with the whole of one of your precious day’s off. 

A single roast rib though, between two, gives all the whole joint satisfaction of a proper Sunday roast, in the form of a relatively light lunch.  It’s also very economical – particularly if you pick up your rib when it’s reduced to clear.  It may not be quite ham hock economical, but at around three quid for what looks, tastes and feels like a proper special occasion treat, I think that’s pretty good value. 


A veal rib also has the advantage over beef here, not just because it’s smaller, but it feels more special, and as I’ve mentioned before, because of it’s richness, you can allow smaller portions (the veal rib I picked up weighed in at about 350g,including the bone, so just about bang on the 150g per person that Rose Prince recommends in her book The New English Kitchen).  Also, because we really should be eating more veal, as I’ve argued before, it’s a treat that fits within the eat less of more meat ethos and you can feel doubly good about doing so.  So everyone’s a winner (even the veal calf, as long as you’ve bought well sourced, British, pink veal – which I presume you have).


To cook the rib, start off treating it just as you would a steak – which is essentially what it is.  Season it generously with salt and pepper and rub it with oil (preferably sunflower or rapeseed, rather than olive, for their higher burning temperatures), then fry in a smoking hot pan for just two minutes on one side then one on the other before transferring the pan to a hot oven (around 200) to roast for no more than fifteen minutes (even as little as ten, depending on how juicily pink you like it).  Take it out and let it rest for a good ten minutes before slicing it in two horizontally, leaving the bone attached to one slice.

While it was resting, you’ll have had time to make a gravy by deglazing the pan with sherry or wine (I used red on this occasion), adding a splash of appropriate stock* if you have some to hand (but just wine and meat juices work fine if not).  Make sure to add to the gravy any juices that run out of the meat while resting.


Serve with roast potatoes – may as well as you had the oven on anyway.  I think roasted new potatoes (halved or left whole depending on size, par boiled then tossed in olive oil with salt, pepper, thyme or rosemary and maybe the zest and a squeeze of the juice of half a lemon, along with a handful of peeled shallots and a few cloves of garlic, roasted at 200 for about 20-25 minutes, till golden) rather than big old roasties, all crispy on the outside and fluffy in the middle that are perfect with a trad Sunday Dinner, but not so much for the light lunch version I was aiming for here.  In keeping with that aim, some lightly steamed purple sprouting broccoli on the side is ideal, and something to be made the most of in its brief season.


* Fill an ice cube tray when you’ve made excess stock, and keep it in the freezer.  A couple of ice cubes of good beef, chicken or lamb stock are ideal for stirring in with the meat juices and wine whenever you’re making gravy.  I’m not sure quite what the official standard unit of a “splash” is, but about two ice cubes worth seems pretty much right.

Tuesday, 19 April 2011

Big Fish (Sea trout baked in a big foil parcel...)


I stopped by at my regular fishmonger the other day, with a mission to pick up something for a quick and easy light supper for two. I nearly achieved it too, picking out a pair of nice fresh looking seabass, and doing my best not to allow myself to be distracted by the sight of the head of quite possibly the biggest trout I’ve ever seen poking out of a small mountain crushed ice on the slab.  The fishmonger took my bass, trimmed their fins and started descaling. “What’s with the giant trout?” I asked, just by way of making friendly conversation. “It’s a sea trout,” he said, looking and sounding more excited about it than he normally does.  “Cool,” I said. “Are you going to be doing those regularly now?” He shook his head. “It’s a bit hit and miss,” he said. I cracked. “Is it too late to ask you to put the bass back and do me the sea tout?” I asked. “Not at all,” he said. And I may have been imagining it, but he seemed genuinely pleased.

And not, I have to say, because selling me the sea trout was going to set him up for life.  He wasn’t winning the fishmonger’s lottery here: he was in fact charging less per kg for the sea trout than the bass would have been, and the whole fish came in at under eight fifty, which he was good enough to round down.


So I was pleased too, although obviously I had now failed in my original mission.  It wasn’t quite Jack going out with the cow and coming back with a handful of beans (although I must say there was a certain magic bean quality to the trout, all silver and gold with a thick lipstick red stripe down its side), in fact it was more like the other way round: instead of coming back with a handful of beans, I had returned with a fish the size of a cow…  Either way, instead of a quick supper for two, I now had the wherewithal for dinner for about six.  Short notice invites went out, and though we couldn’t rustle up a full quorum, my good friends, and now near neighbours, Darren and Christabel were good enough to come round and help us out…

Far and away the easiest way to deal with a fish this size, that hangs over the side of even your biggest roasting tray, let alone any pan, is to make a parcel to bake it in, out of foil, or parchment paper, or both.  There is an argument that if you just use foil it can impart a ‘funny’ (presumably metallic) flavour to the food cooked inside it, which I have to say is not something I’ve ever observed.  Parchment paper will avoid any possibility of that (however slim), but is much more fiddly and harder to seal.  A double layered parcel of parchment inside foil gives the best of both worlds, and also, which is the main reason I chose to go that way in this case, it seems to create a better, more rigidly structured parcel than just foil.  For a fish this big that seemed important.  Parchment paper is also, I have to say, more aesthetically pleasing than foil, for what that matters…


Line the base of your parcel, however constructed, with sliced red onion and fennel.  In this instance I used a whole onion and a whole bulb of fennel, both being quite small, it could as easily have been half of each, entirely depending on size. Grate the zest of half a lemon over the fennel and onion, then squeeze over its juice .  Add a few generous fronds of dill, plenty of salt and pepper, olive oil, and a glass of white wine.  Slash the flanks of your fish and rub salt, pepper and olive oil into it’s skin.  Season its cavity too, and line it with slices of lemon.  Lay a line of lemon slices on the fennel and onion base, lay the fish on top, and line it’s upper flank with lemon slices.  Another squeeze of lemon and maybe a splash more wine over the lot and seal the parcel.

Bake in the oven at around 180, for around thirty minutes (it may need a little more or a fraction less, depending on quite how big your fish is, although one of the several beauties of cooking it this way is that the penalty for overcooking is less severe than it would be cooking fish in any other way – the flesh in there’s going to stay moist pretty much whatever you do.  Nevertheless, do try not to overcook it, and make sure you check it for doneness sooner rather than later, in the usual way, by sliding a knife into the flesh along the spine to see if it is opaque and pulling easily away from the bone.  If so, it’s done.  If not, quite, just reseal the parcel and leave it to steam in its own juices for five minutes more.  If it’s a long way from done, obviously, put it back in the oven.  My fish, weighing in at around a kilo and a half, took about thirty five minutes all together.  When it is done, you should also find that the fennel and onion has almost melted into the lemon juice, wine and juices from the fish itself to make a delicious sweet-sharp sauce.

Unwrap the parcel and serve it up – you should find that the flesh of the fish just slides off the bones onto your spatula.  We had it with simply boiled new potatoes, a salad of celery, cucumber and capers, and a bunch of watercress.  Sea Trout just might be my absolute favourite fish - as big and meaty as salmon, with all the delicacy of regular trout.  And free of the burden of either the ethical issues (as far as I have been able to find out), or the price tag attached to salmon, to boot.  Or the flabby, flaccid, fatty flesh of a lot of farmed salmon that generally makes it not worth the hit on either wallet or conscience anyway.  There was nothing at all flabby or flaccid about this sea trout, and it was fat only in a good way.  A very good way.


The one fish fed the four of us, with more than enough left over to provide Becca and I that quick supper for two I’d originally set out to buy for.  So the following day I fried up a handful of thickly sliced chestnut mushrooms, with a little garlic and chilli, then added half of the left over fish and fennel and onion sauce, topping it up with an extra splash of wine.  That was plenty to make a sauce for a bowl each of linguine, again with a little watercress as a peppery garnish.


And there was still enough left over for Becca to take to work the next day for her lunch.  It might not quite of been the feeding of the five thousand, but 3 meals and 7 portions out of one fish and eight quid ain’t bad.


Thursday, 14 April 2011

... & peas & ham & peas etc


Food is Good is proud to present the second and concluding part of our Ham & Pea Adventure, or How We Got 4-5 Good Meals (or a significant part thereof) Out of Two Quid’s (£2) Worth of Ham Hocks.  Now read on…

Meal 3/4: Pea and ham soup

There are two distinct and very different types of pea and ham soup, although in the making of them they are all but identical.  Made with dried split peas (either in standard green or daring yellow) you get a traditional London Particular, a thick, hearty, winter warmer of a soup, while using fresh or (more likely, and considerably more convenient, and really every bit as good) frozen peas will result in a lighter, brighter, fresh and refreshing soup suitable for a spring or summer lunch (and particularly so with the addition of mint), and even servable as a chilled soup, as Becca and I had it for lunch this weekend just gone, out on the roof terrace in the blazing sunshine.  In the first half of April.  I’m not sure that’s right at all, but it’s not going to stop me enjoying it…


Minted Pea & Ham Soup

1l ham stock
1 onion finely chopped
250g fresh or frozen peas
a couple of sprigs of fresh, soft leafed thyme (optional)
a small handful of mint leaves

Making the soup is simplicity itself, and very quick.  It is, as I said above, essentially identical to the process for the split pea and ham soup I made with my Christmas leftovers, except even simpler and quicker in that there’s not even the question of having to soak the peas beforehand, and they cook as much as they need to in just a couple of minutes.

Start by finely chopping your onion and softening it in your pan with olive oil and a grind of pepper (no salt, there will almost certainly be enough residual saltiness in the stock, and if not you can add more at the end).  I added the stripped leaves from just a couple of sprigs of my growing thyme as well, but you don’t have to, and I would only recommend using the very freshest, youngest and softest of thyme leaves here, so if you have a pot growing, go ahead, if not don’t worry.  In a separate pan bring the stock to somewhere close to the boil.  When the onion’s soft add the peas, and the hot stock.  Bring to a gentle simmer for really just a couple minutes till the peas are done, then add a handful of shredded mint leaves.  Check the seasoning now.  Blitz with a blender till smooth.  Serve hot or chilled if the weather outside makes that appropriate, with a few shredded pieces of ham if you have any leftovers, or a decorative sprig of mint.


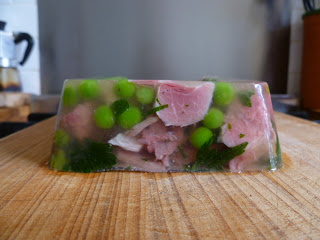
Meal 4/5: Jellied Ham and Pea Terrine, with Piccalilli.

This is my version of a trademark Mark Hix dish that was a menu staple at the Rivington in my day, which I was inspired to recreate not solely out of nostalgia (my memories of working in restaurant kitchens are not uniformly rose tinted ones…), or even just because it’s such a good way to use a ham hock and a little of its cooking liquor (which it certainly is), but by the lunch we’d just enjoyed so much at The George in Chideock, directly before stopping in at the farm shop where I found the hocks.  It was specifically, of course, the potted pork and, in particular, the piccalilli, that was so good it presented a challenge. 

Now my memories of making piccalilli at the Rivington are particularly unrosy.  Indeed I remember it as being an outstandingly arduous and unrewarding chore (among many such), and as a result, combined no doubt with the fact that until I had it at the George the other week I’d never really felt any particular affection for it as a pickle anyway, it was something that never crossed my mind to do at home.  As it turns out though, in domestic as opposed to the industrial quantities you have to prepare in a restaurant kitchen (and believe me, cooking industrial quantities of vinegar is not just arduous, but actively unpleasant), it is, far from being an arduous chore, actually remarkably easy to make.  Indeed it turns out to be much less work than a chutney of the kind I make regularly without even thinking about.  And right now, at the time of writing, and thanks to the good people at The George, it is undoubtedly my very favourite pickle of all…

Both these recipes are lifted more or less directly from Mark Hix’s British Food, adapted in the case of the terrine by my simple addition of peas and mint.  I’ll do the piccalilli first, although it seems like the secondary item, simply because otherwise you’ll likely do what I did and make the ham terrine first and then discover that you were meant to have made the piccalilli a week ago.  Don’t worry if you do, the terrine itself needs to be left in the fridge overnight before eating, and will keep in there for at least another three or four days, by which time the piccalilli will be more than edible, if not quite yet at its peak…

For one jar of Piccalilli (Ideally made a week ahead)

Half a medium cucumber (halved lengthways, deseeded and diced into roughly 1cm pieces)
¼ of a large head of cauliflower, cut into small florets
½ an onion (peeled and chopped)
½ a tablespoon salt
75g caster sugar
1 heaped teaspoon English mustard powder (or a couple of ready mixed mustard)
½ teaspoon ground turmeric
About an inch of fresh red chilli, deseeded and chopped
75ml malt vinegar
75ml white wine vinegar
½ tablespoon cornflour
75ml water

Whether you peel your cucumber, or use red or yellow onions is purely an aesthetic decision, and entirely up to you. In each case, the dark green of the cucumber peel or the red onion will provide a contrast to the otherwise uniform yellow of the finished pickle. I peeled my cucumbers and used red onion, you could go with unpeeled cucumber and yellow onion, or go crazy and have both the dark green peel and the red of red onion, whatever rocks your boat.  The colour of the red onion does bleed a little though, rather like a rogue red sock in the wash, so your finished piccalilli will be rather more chrome yellow in tone than the bright cadmium that is familiar.

Put the cauliflower, cucumber and onion into a bowl, sprinkle with the salt and leave for an hour, then rinse well and drain.  Put all the other ingredients, apart from the cornflour and water, together in a saucepan, dissolving the turmeric and mustard and bring to a gentle simmer for three minutes.  Mix the cornflour with the water and whisk into the vinegar mix, then continue to simmer for a further five minutes.  Pour the hot liquid over the vegetables, stir together thoroughly and leave to cool. 

According to Mark, it should be left in the fridge for at least a week before eating (although impatience will probably always get the better of me), and sealed in a sterilised jar will keep in there for up to six months.  Good advice on sterilising jars, along with the original recipe can be found here


Jellied Ham & Pea Terrine

The meat from one ham hock (Loosely shredded, chopped into rough 1cm dice, or, as I prefer, a combination of both - minus a little previously used to garnish the risotto below and soup above)
350ml of the stock from cooking the hock
3 sheets gelatine
A small handful of cooked peas (about 50g)
A small handful of chopped parsley
A small handful of chopped mint

Put the three sheets of gelatine in cold water to soak. Then take 350 ml of your ham stock - if it looks scummy or cloudy skim and filter it through muslin - Bring it to the boil in a small saucepan, then remove from the heat.  Take the soaked gelatine sheets, squeeze out the excess water from them, dissolve them in the hot stock. And leave it to cool, but not set. 

In Mark’s original recipe he suggests putting the chopped parsley into the jelly mix, I preferred to mix that in with my ham, peas and mint in a mixing bowl.  I haven’t been specific about quantities for any of the green elements in this recipe, because I think you just add enough of each so the ratio of pink ham to green peas and herbs is aesthetically pleasing to you.

When the jelly mix is cooled but not set, pour a little over your ham, pea and herb mix in the bowl and stir it through then tip into your terrine dish (I use one of those lidded plastic Indian takeaway containers) and top up with the remaining jelly.  Cover with a lid or clingfilm and leave to set in the fridge overnight.

To serve, tip out onto a wooden board (you may need to dip your dish briefly in hot water to release it if you’re not using flexible plastic) and carve as best you can into thick slices (don’t worry if those slices just fall apart), to eat on thick slices of toast with the piccalilli on the side.  A delicious light lunch or perfect dinner party starter. 


Tuesday, 12 April 2011

Ham & peas & ham & peas & ham…


Our recent trip down to Dorset wasn’t all about the fish and seafood, there’s also a lot of fantastic produce coming off the land in that beautiful part of the world, and one of the very many good reasons to want to go back there, soon and often, is to try more of the local meat and veg.  As it was we returned home with just a big bag of foraged wild garlic from Chideock, a rather smaller bag of the prettiest, purplest, purple sprouting broccoli ever – quite pretty enough to put in a vase on the kitchen table, let alone on a plate to eat – and, from the same farm shop as the broccoli, two ham hocks.

I’ve written quite a bit about neglected or ‘forgotten’ cuts of meat on this blog, and that’s not just out of curiosity, or because I’m being wilfully esoteric, or even because these cuts are inherently more interesting and fun to cook with than the regular ones (although I happen to think they often are), but because they taste really good.  And because, generally on account of being fatty (yum!), or knobbly looking, or both (or indeed neither, in the case of the truly inexplicably cheap pig’s cheeks), that flavour comes at a sometimes ridiculously low price.  And on that score, these ham hocks  - both around 750g and coming in at just under two quid for the pair – must establish some kind of new benchmark.  The bar has been considerably raised, or lowered, I suppose.  Because that two quid supplied the feature ingredient in two dinners and one lunch for two, a couple of solo lunches and the starter for a dinner party.  And there’s still a litre of stock in the freezer.  And even better, stretching the meat out to such lengths required no great labour, or cunning, or skill on my part, nor obvious parsimony.  On the contrary, the dishes served were, I like to think, and in their own simple way, really quite luxurious.

First cook your hocks:

First thing, obviously, was to cook the hocks.  Which could scarcely be simpler, as cooking goes, although it takes time.  Mainly in soaking the hocks overnight, in a big pan filled with plenty of water, to de-salinate them, so it’s hardly time arduously spent.  Once soaked, and the soaking water discarded, refill the pan with enough water to cover the hocks, add a roughly chopped onion, carrot, leek, stick of celery or combination of all or any of those, with a bayleaf, couple of cloves of garlic, sprigs of thyme, peppercorns, mustard and fennel seeds etc, just as you would for making any stock.  Bring the water to a gentle simmer and leave it there for a good couple of hours.  Then turn off the heat and let the hocks cool in the stock.  And that really is the crucial part of the cooking done, really, for all those meals I listed above.  Which leads me to wonder why, how, it can possibly be that not only is the ham hock neglected, but that it’s not an absolute staple of all our diets.  Particularly in these economically straitened times.  It really is a mystery.  Anyway – here’s how a couple of quid’s worth of ham hocks (and quite a lot of peas) became five meals (or a substantial part thereof).  And how the week after we came back from Lyme Regis became something of a festival in celebration, not only of the ham hock, but also it’s natural and ever faithful companion, the pea:

Meal 1: Honey mustard roast hock

As with lamb shanks, a single ham hock might often be a little too much for an average individual portion, but appear rather meagre if stretched as far as two.  On the other hand, most of us could probably do with reducing our meat consumption, for the sake of our own health, and that of the planet, not to mention the animals that must live and die to supply the meat we consume.  To that end, smaller portions of well flavoured meat are ideal, and a single hock, glazed with honey and mustard serves two people with perfectly healthy appetites (as I believe you will have gathered we are from any regular reading of this blog) very well.


Once the hock has been cooked and cooled in its stock, simply take it out and trim it of it’s fatty shroud, making sure to leave at least a thin layer of fat for the honey mustard glaze to adhere to and to keep the meat moist in the oven.  You can stick the hock with cloves too, if you want, as I did with my Christmas ham, but couldn’t be bothered with for this quick Sunday supper.  Gently heat a tablespoon of honey and a teaspoon or two of mustard (English or French, whichever you have and/or prefer) together in a saucepan until runny and pour over the hock in a roasting dish, making sure it gets evenly coated.  Then simply roast at around 180, for about 15 minutes.  I served the ham simply pulled off the bone, alongside roasted, layered, potato and onion and simple peas. 


Some good old fashioned parsley sauce would perhaps have been the perfect finishing touch, but not very Becca friendly, I’m afraid.  Perhaps I could have done a pie and mash shop style parsley “liquor” – except made with the ham stock, of course, not eel stock, thickened with flour and lurid green with chopped parsley – and next time I might, although I have to admit, that every time I’ve tried a traditional old East End pie and mash shop I’ve always been disappointed, not to say mildly disgusted, and the liquor in particular has always been thoroughly unappealing.  That said, and it’s by no means a trad pie & mash shop, but I did recently have excellent jellied eels as a starter at Fish Central in Kings Square near Old Street, EC1.


Meal 2:  Ham, pea and broad bean risotto with wild garlic.

This risotto was made in the usual way – as described here, using a half litre of the stock from cooking the hocks (strained, skimmed and reheated).  Meanwhile I podded some broad beans and steamed them, adding a good handful of frozen peas a couple of minutes before they were done, then refreshing them in cold water till the risotto was almost done.  At the same time I pulled apart the remaining ham hock, trimming off all the fat, and chopping the large pieces of meat into rough 1cm dice, these I set aside, mostly for the terrine I’ll come to later, but allowing some for this risotto.

When the risotto was ready for finishing off with its final splash of wine and extra ladle of stock, I stirred the beans and peas through it, then right at the end, just before finally taking it off the heat, stirred in the garlic leaves and a small handful of the smaller, more shredded bits of ham.  This was a real contender, along with the crab and wild garlic risotto we had on the night of our return from Lyme Regis, for the title of best risotto I’ve ever made.


At this point, I'm going to take a break.  Be sure to join me next time, when this pea and ham adventure will be continued...

Thursday, 7 April 2011

Get a load of those eggs


Just a quickie, mainly to put up that picture of the most beautiful eggs I have ever seen, found on a Sunday walk in the Chilterns with Becca and her parents, just left at a farm gate with an honesty jar.  Half a dozen eggs, all different shades including colours I’ve never seen hen’s eggs come in.  There is, after all, a reason why the colour’s called duck egg blue, or the walls of our kitchen are painted “Starling’s Egg”, but we had both of those, and a pale pastel green that I don’t think I’ve ever seen any egg come in.  It was like Greek Easter come early (except one colour we didn’t have – perhaps fortunately, was deep red…).


And tasty too, as only truly farm fresh eggs can ever be.  The first I had I poached, as poaching is the way of cooking eggs most dependent for its success on their freshness.  And I wasn’t disappointed, although, aesthetically, it may not have been quite as perfect as the poached egg I previously posted.  Nevertheless, served on toast, with a few slices of a big open cap mushroom, fried up with slivers of garlic and parsley it was pretty sublime.


Then I used four to make a tortilla, a proper Spanish tortilla, or PST, as described, but not pictured, here.  Four eggs, two medium sized Maris Pipers and half a large onion came to just the right amount to fill my 20cm pan to make a tortilla which, in turn, was just the right size to have half, warm, for lunch the day I made it, and the second half cold for breakfast the next day.  I do love tortilla for breakfast - the only downside being that it’s just another thing making you wish you lived in Spain


Monday, 4 April 2011

Eating in in Lyme Regis


Our recent trip down to Dorset wasn’t just about eating out.  Even with the kind generosity of Mark Hix, we could scarcely afford it to be, but even if we could have done, the reason that Dorset restaurants are worth the slog down from London (which is hardly short of places to eat out, after all) is not just the view out of their windows (although the view over The Cobb, from Hix Oyster & Fish House, must be one of the finest views out of any restaurant window anywhere, and worth the trip in its own right), it’s also because of the great local produce, from land and sea, that they have access to.  And I wouldn’t want to go all that way, and have that produce available, and not have a go with it myself.  So self catering was a given, and the choice of accommodation involved a lot of peering at Jpegs on websites, trying to work out which apartments/studios/cottages we were looking at had gas hobs and more than a single square foot of work service in their kitchen/ette.

Being in Lyme itself, with a view down to the sea (although the sea itself spent most of the time lost in haze, so although I’m sure it was visible, it was mostly indistinguishable from the sky), rather than inland with a view out across rolling hills and lush pasture, the focus, for this trip, was very much on fish.  The hope was that we might even get a chance to catch some of our own.  We went out with Harry May, another mate of Mark Hix, incidentally, skipper of the mackerel boat Marie F, who told us that, although it was really too early in the season to expect the fish to be back from their deep sea wintering waters, the previous day, presumably thanks to the unseasonally balmy weather, they’d been pulling in mackerel like there was no tomorrow.  Unfortunately for us, it turned out that there really might as well not have been, a tomorrow that is, from the point of view of catching mackerel, at least.  Because that was the day we were out, and we had not a nibble.  So much for my sushi plans.

So, a trip to the fishmongers it had to be, but as that was the Old Watch House, all but on The Cobb itself it came a close second to actually having caught the fish yourself.  On the first day we took home a cooked crab for lunch.  It was just medium sized, but weighty, boding well for the quantity of meat inside the beautiful rust brown shell.  That boding didn’t let us down.  The meat, both brown and white, was not just plentiful, but delicious.  Scooped and picked out of the shell into a bowl, seasoned with salt and pepper, a squeeze of lemon and a light drizzle of extra virgin olive, and served with thick wedges of excellent, nutty granary bread, and a little salad, it was quite possibly the best crab I’ve ever had.  And as I didn’t cook it myself, only picked out the meat, I can say that without any fear of boastfulness.  It was all down to the crab itself, and to whoever had boiled it, nothing to do with me.

We even had enough meat left over from lunch to make a crab linguine dish for supper, the technique for which was more or less identical to my previously posted smoked trout linguine recipe, except without the smoked trout, obviously, and the crab stirred through the pasta right at the end before serving.  That was also delicious, and I will happily take at least some of the credit for that.  I didn’t, unfortunately, for reasons I can’t quite explain, get any good photos, of either the crab itself, or the pasta, so crabby pictures will have to wait for another time (the linguine looked very much like the smoked trout version anyway, if your imagination needs the assistance).

That wasn’t the end of the crab though, I boiled up the leftover shell, with an onion, a couple of sticks of celery, a clove or two of garlic and some herbs and spices (thyme, bayleaf, peppercorns, mustard, fennel and cumin seeds), and got a litre of delicious, crabby stock, half of which I used to make a crab and wild garlic risotto for dinner on our return to London.  Just a pure simple, plain risotto, made with just 3 rashers of finely shredded smoked bacon, a scattering of pine nuts and 4 shallots, following the technique described here.  Right at the end, when the risotto was ready to serve, I stirred through a handful of the wild garlic leaves and stalks that we’d gathered from the pathside on a walk down from Chideock (after our fabulous lunch at The George) to the sea.  It was beautifully, simply, delicious.


Back in Lyme, though, having failed to catch any mackerel of our own, I had fully intended to buy some, but it seemed that either all the fish that had returned early to the shallow waters around Lyme had either been caught the day before by Harry and his mates, or had realized their error and buggered off back to the deep ocean for the last weeks of their winter sojourn.  Either way, there were none on the slab at the Old Clock House.  They did though, have some very shiny, bright eyed, red gilled herring, freshly landed and local.  As my plan for the mackerel had been to serve them essentially raw, but cured in citrus juices - that is, effectively, lightly pickled – then herring seemed a most appropriate substitute.


Herring ‘Escaviche’

I use this way of preparing fish, most commonly, as I say, with mackerel, but I’ve done it with sea bass too - you could use any firm fleshed fish, the crucial thing is simply that whatever fish you use be really good and fresh, but I think it works best with an oily fish like mackerel or, as in this case, herring.  I call it ‘escaviche’ because it’s not quite a traditional Spanish/Moorish escabeche, and not quite a Latin American ceviche, but something in between.  In essence it is escabeche, except for the one fundamental difference that in an escabeche the fish is cooked before pickling, which, to my mind, if you have good fresh fish, is unnecessary.  So you might say it’s a ceviche, except that in a ceviche, the fish is usually diced into small cubes, and marinated briefly, almost just dressed in a citrus dressing, and served like a piscine steak tartare.  So ‘escaviche’ it is then, until I think of something better.


The first thing to do is fillet your fish, although of course you can get your fishmonger to do that for you (but if you do, make sure he gives you the left over ‘frames’, for making stock with – you can always freeze them if you don’t need the stock right now).  On this occasion, as I was using herring, and they are small, I decided to try butterflying them – although this is by no means necessary.  This is something I’d never done before, and, as we were on holiday and away from both my books and an internet connection, I had to rather improvise the technique.  I did each of the two herring I had in a different way, first slicing along the belly and folding out from the spine, secondly slicing along the spine and folding out from the belly.  The latter proved altogether more successful than the former, both aesthetically and in terms of leaving fewer small, feathery, but nonetheless annoying bones in the fillet.

Once filleted and cleaned, lay the fish, skin side down in a shallow dish and prepare the marinade.  Grate the zest of an orange and a lemon over the fish, then squeeze the juice (I used the whole orange and half the lemon, it will depend entirely on how juicy they are) into a pan, along with the juice of two limes, about half a glass of wine and a few peppercorns and mustard seeds, and put it on the heat.  Meanwhile salt and pepper the fish, and scatter over some leaves of soft lemon thyme (or parsley would do, ordinary thyme might be a little tough and bitter), finely sliced red onion and a handful of capers.  When the pan of juice and wine comes to the boil, pour it over the fish.  You will see the outer surface of the fish turn immediately opaque, and the fillets clench.  Turn them in the dish so they are now skin side up, and simply leave to marinate.  Quite how long to leave it is up to you, how confident you are in the freshness of the fish, how thick the fillets are and how squeamish you and/or your guests are about eating uncooked fish.  Leave it an hour and it will be, if not sushi, then effectively very lightly seared on the outside, sushi on the inside (this is where the thickness of the fillets will really make a difference).  Leave it overnight in the fridge and it will be, effectively, cooked through.  Either way is good.  Apart from the ‘doneness’ of the fish the main difference will be that the shorter the time it’s in the marinade, the more you’ll taste the fish, the longer it’s in, the more you taste the citrus.  It’s entirely up to you.  And if you are a sushi fan, and want it as sushi-ish as possible, let the marinade cool thoroughly before pouring it over the fish


These particular herring came full to bursting with fat, creamy roes, which had a queasy beauty of their own which put me in mind of Francis Bacon. Becca thought Georgia O'Keefe.


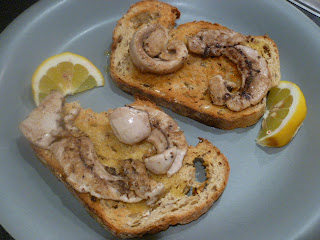
I simply seasoned them with salt & pepper, lightly fried them in a little olive oil, and served on toast with wedges of lemon as a simple starter.


Mussels in cider

According to the nice man at the Old Clock House, mussels are at their best at this time of year (and should be till the end of this month, the last with an ‘r’ before spawning season – although cultivated mussels are available, and sustainable, all year round), and they certainly looked good so I took a big scoop, about a kilo, I guess, of those to cook up in some local Dorset cider.


I just scrubbed the mussels, pulling off the “beards” and discarded any that didn’t firmly close while I was doing it.  Then put them aside in a big pan of fresh, cold water while I roughly chopped some celery (you could use onion, and I might well if I was using wine instead of cider, but celery and apple have a special affinity), about three average sized sticks would be about right, and finely sliced a little garlic and chilli.  I heated some olive oil in a good size pan with a lid (preferably a glass one) and sauteed the celery, garlic and chilli with plenty of salt and pepper, and a little lemon thyme (ordinary thyme would do, or you could leave it out entirely – I just happened to have lemon thyme growing in a pot on our holiday rental balcony and it seemed a shame not to use it).  When the celery was just starting to soften, I strained the water from the mussels and tipped them into the pan, gave a good stir, poured in about 200ml of cider and covered the pan.

I let the cider come to the boil and steam the mussels for just about three or four minutes, until they’ve all opened up and you can see the plump orange pillows of mussel meat inside the blue black shells (hence the glass pan lid being such an advantage).  Then I took off the lid, dropped in a handul of the tender yellow leaves pulled from the heart of the celery and stirred it through, and served the mussels in a bowl with some good chunky bread.  Really easy.  Really, really good.